Workbench
Eckon Speed Restriction Signs
Eckon produce a selection of brass speed restriction signs in the older style - before the road style signs came into use. I have tried to use as much of this pack as possible so the layout is speed restriction heavy! Making them is simple; Cut the top of the sign from the fret and then cut a length of the brass sign post. You can either glue or solder these parts together. I glued mine, along with the optional arrows that come in the pack.
Textured Paint Roads
At this year's York Model Rail Show, I bought some Green Scene textured paint. I bought the concrete and light tarmac. I am thoroughly impressed with the effects of the concrete. However, I think that the light tarmac may be a bit too light. I plan on going over it with a black wash to darken and weather it.
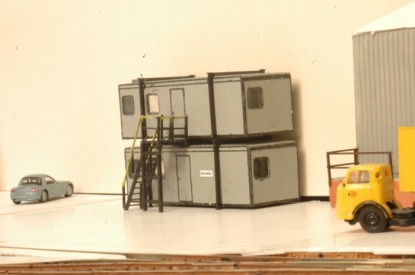
Some more Kits built
Over the past few weeks, I have built some more knightwong kits. To add to the TMD is a loco wash, double portakabin and a maintenance walkway. This just leaves the diesel/oil depot to be bought and built.
Roadway coming along
The TMD entrance has not got its very own road! I have mixed darkish grey which is not toooooo bad but needs patching a bit and neatening up. A bit of paving and grass around the edges will hopefully finish it off.
Station: Almost there!
Just needs some stone walls and steps! The platform edge is weathered and the lights are almost wired in (have done it loosly so it needs finishing off properly). Once the Stone Walling is in place, it will make it looks much better and then extras like a shelter and seating can be added later
Backscene Industrial units
There are some low relief warehouses made from Will's corrugated steel, brick plasticard and plain plasticard. one of the units has a loading platform with a large door and road level access next door. For detailling, I have used kit left overs, for example, railings on the platform are from the Peco train Shed Unit kit.
Ballasting
Parts of the layout now have ballast. I still need to do the electrics but have left space for the droppers so the ballast in large patches! Nevertheless, I would reather get things done while I can't do something else.
Dowels in The Lift Out Sections Complete
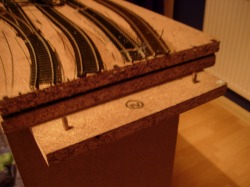
Another one of my bodged (!) 5 minute jobs. While I had a spare 5 minutes, I decided to put some spare dowels in the lift out section to make an accurate join every time. I found some doweling left over from an Ikea flatpack (aaaarrrrrrrrrggggghhhh!) got the drill, 2 drill bits - one just slightly smaller than the dowel and one just slightly bigger. I drilled a hole in the bottom section with the smaller drill bit and hammered the dowel into the baseboard I then put some black paint on the top of the dowel to make a mark on the other board. I rested the other board on top and pressed down for the paint to make a decent mark. After, I drilled a larger hole on the black dot imprinted on the wood and repeated the process on the other side. You may be thinking this is the most unusual method ever but it was all I could think of a the time!
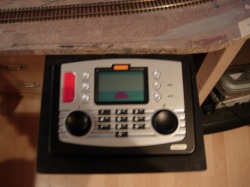
Controller Base Made
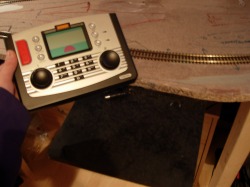
In the same day, I found another 5 mins to bodge yet another job! I had already painted the base which was an off-cut conincidently the right size for my controller bt has yet to be screwed to the underside of my baseboard. The base already had holes in for the wires to exit under the baseboard. First, I got the drill which I still hadn't taken back to where it belongs and drilled some small pilot holes (the base was G clamped to the baseboard - very handy!). Secondly, I took 3 screws from the falling apart shed in the garden and used a Bosch mini drill (also very handy) and screwed the screws up through the baseboard with a bit of good old Yorkshire elbow grease! And, as the Francais say, et voila! But, after 2 minutes of admmiring it, I noticed it was slightly wonky! Look, i'm not going to be a joiner or a handy man, so who cares - my handy work makes me laugh though :D
Baseboard construction
I have had my baseboards built by my uncle to a very high, customised standard. The size is about 10'6" x 8' and is made from 17mm chipboard - accepts pins and offcuts are perfect platform hight! They were built in quite a few sections from 2 8' x 4' sheets, 2' x 1' framing and 3' x 2' (I think) legs. First of all, it was a trip to B&Q, total bill, about £30 for 2 sheets of chipboard and 2 lengths of 2' x 1' and 1 length of 3' x 2' (I think). When we got back to my ready emptied room, the 2' x 1' was cut the right lengths to go on all the relevant walls. Then, the sections which were cut out a B&Q were fixed to the battons on the wall. After that, 3 legs were put along the 10'6" wall and the legs for the fiddle yard are made from chipboard. The fiddle yard have a lift out section so the room can have easy access. I then jig sawed out two sections to fit my plan. the noards are yet to have supporting battons but first I am going to drill the holes for the points and then fix battons making sure they are not covering the holes.
